Showing posts with label recipes. Show all posts

Friday, December 2, 2011

THE frosting

I can take absolutely no credit for it, but I also don't want to withhold such tasty information.

Joy the Baker - you've done it again.

The Best Chocolate Buttercream Frosting
via Joy the Baker (adapted from Delilah Bakery)

Ingredients
1 1/2 C (3 sticks...oops) unsalted butter, softened
1 C cocoa powder
3/4 tsp salt
4 C powdered sugar
2 tsp vanilla
1/2 C milk
1 C heavy cream
2/3 C Ovaltine (blast from the past, right??)

Directions
Cream butter, cocoa powder and salt together. I learned that having soft butter is key - this will save you lots of effort during the "creaming" process. Also, a stand mixer would be ideal... I was working with my Kitchenaid hand mixer, which I adore, but let's be real, it's no Kitchenaid Stand Mixer.

Continue mixing and add in powdered sugar while adding milk and vanilla extract. Hubby and I learned this was a great teamwork opportunity. No WAY I could have mixed in all that good stuff without absolutely spilling it everywhere.

Increase mixer speed and beat until smooth.

Separately in a 2C measuring glass, stir together heavy cream and Ovaltine. Pour this into the frosting slowly until the consistency is to your liking.

You're done!

I wish I had an equally awesome cake recipe to share, but this time due to scheduling limitations, we had to go with the box. Shhh.... don't tell anyone! The cake was made particularly with my grandfather in mind. He is crazy about his chocolate cake, so I knew this would be a fun Thanksgiving/92nd birthday treat!


We may or may not still be eating the remaining frosting. Out of a bowl. With no accompaniment.

Wednesday, November 9, 2011

Chile Verde Pulled Pork Tacos

Here's one of those little recipes that helps us overcome our Tex-Mex withdrawal blues. Those of you who haven't developed such an addiction are sure to be in for a treat as well because this dish checks so many crucial boxes otherwise: savory = check, slow-cooked = check, slight spice = check, can-eat-it-from-a-bowl = check... there are many more qualities but, I'll let you discover for yourself. These good-as-street-style tacos are sure to please, be it by bowl or tortilla, and I guarantee they'll leave your posse begging for more.


Chile Verde Pulled Pork Tacos (original Lewis recipe)


Ingredients
2-3 lb pork shoulder roast
2 large white onions, finely chopped
1 lb tomatillos, washed and roasted
3-4 poblano peppers, washed and roasted
2 cloves garlic, minced
2 C chicken broth
Oregano
Cumin
Salt, pepper
Kosher salt
Queso fresco for topping
Flour
Corn tortillas
Tortilla chips (optional)

Directions
Preheat oven to 500

Place tomatillos/poblanos directly on wire rack for roasting; place foil below to catch any drippings; roast for 10-12 minutes or until roasted, turning a few times.
Once roasted, remove stems and seeds from peppers and chop finely; set aside. (Need help remembering how to roast? Check my crash course here)


Pour a few Tsp canola or vegetable oil into medium-medium-high Dutch oven.
Season pork shoulder with kosher salt and pepper and lightly coat with flour.
Once Dutch oven is fully heated, sear pork roast 2 min/side until dark golden brown coating forms. Then remove pork and set aside on a plate. Discard oil from Dutch oven.

Add into Dutch oven 3 Tsp vegetable oil and bring it back to medium heat. Add onion, saute. Add minced garlic once onions are almost sauteed. Stir a few minutes and turn heat down to medium-low. Add finely chopped tomatilos and poblanos. Add salt, pepper, oregano and cumin to taste. Cook for a few minutes until the mixture reduces.


Add pork shoulder back into Dutch oven. Pour in chicken broth until it covers 3/4 pork shoulder. Turn down heat to a low simmer and let it simmer, uncovered, for about 3 hours, turning the pork every 45 minutes/hour; add broth when the liquid gets low.

Remove the roast and it should be fork tender at this point. Turn up heat on green chile sauce to medium and stir and reduce for 10-15 minutes. Pull pork shoulder using forks and add back into chile sauce.


Serve in corn tortillas with yummy queso fresco and a squeeze of lime! Also delicious in a bowl atop tortilla chips - you won't be disappointed :)


Friday, November 4, 2011

Sugar, Spice and Everything Nice

And no, despite the sudden surge of baby bumps among my lady friends, I am not talking about babies. I'm talking about cupcakes!


I needed to bring something sweet and savory to our quarterly whisky dinner club (yes, you heard me... I like to keep a few surprises up my sleeve) so when I came across these absolutely lovely cakes on joylicious (swoon) I knew I'd met my match. The fact that the recipe comes from Martha only further validated my impulse to bake.

Pumpkin Spice Cupcakes with Cream Cheese Frosting


Ingredients
Cupcakes
( makes 18, or 12 and one mini-cake, which is what I did)
2 cups all-purpose flour
1 teaspoon baking soda
1 teaspoon baking powder
1 teaspoon coarse salt
1 teaspoon ground cinnamon
1 teaspoon ground ginger
1/2 teaspoon freshly grated nutmeg
1/2 teaspoon ground allspice
1 cup packed light-brown sugar
1 cup granulated sugar
1 cup (2 sticks) unsalted butter, melted and cooled
4 large eggs, lightly beaten
1 can (15 ounces) pumpkin puree (I didn't use the whole can... more like 1/2 - 2/3 to avoid an overpowering pumpkin taste)


Frosting 
(this quantity is pretty large... I halved it for one dozen cupcakes and had a little leftover for a light layer over my mini-cake which I made out of my leftover batter - this made a great treat to share at the office the next day)
16 oz cream cheese, softened
4 sticks butter, softened
1 teaspoon vanilla extract
4 cup sifted confectioners’ sugar
1 teaspoon of cinnamon - that was my little addition - it gave the icing a really nice scent and a pretty speckled look

Directions
Preheat oven to 350 (if your oven is under your stove, now is the time to place your butter and cream cheese on stove top to get rid of the fridge chill... keep both packaged for now, obvi)
Line cupcake pan with liners
In medium bowl, mix dry cupcake ingredients (flour, baking soda, baking powder, salt, cinnamon, ginger, ginger, nutmeg, allspice)
In large bowl, mix sugar, brown sugar, butter, eggs
Mix wet and dry together in large bowl and stir until smooth
Add pumpkin puree (again: I didn't use the whole can... I wanted my cake to taste more spice-like and less pumpkin pie-like)
Fill cupcake liners 1/2 way with batter (I use the ladle and spoon method to get a more precise pour into each cup - this will help you develop a more uniform-looking batch in the end)
Bake for 24ish minutes or until the cakes bounce back when touched (as always, I do a mid-bake rotation to account for any unevenly heated spots in my oven)

Meanwhile... let's get the frosting going. You'll want to use your stand or hand mixer to get a really nice texture.

In a large bowl, mix butter and cream cheese
Add in powdered sugar - s-l-o-w-l-y and mix... if you're not careful, your kitchen will look like the North Pole in no time
Add vanilla and mix until smooth
Add cinnamon and mix until smooth
Let chill in fridge while the cakes bake

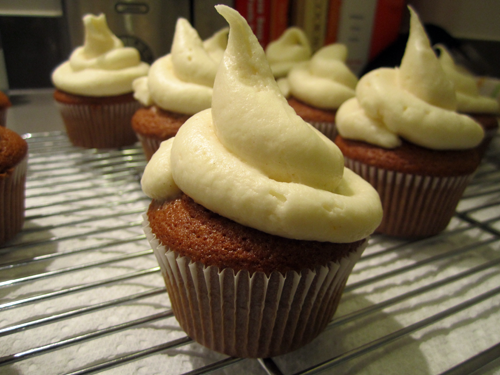
When your cakes are done, remove them from the oven and place the cupcakes on a wire rack to cool (I did this after 5-10ish minutes when they were cool enough to handle comfortably)

Only when cupcakes are completely cool should you consider topping them with icing - if you don't wait, you'll get a melty gooey result that just looks bad. Don't do it.
So once cool, remove the frosting from the fridge and scoop it into a large ziploc bag - this will be your icing tool! If you have a real icing tool, congratulations, but for those of us who don't, this trick works great (a guy in my apartment asked if I picked these up a local boutique shop - obvi the highlight of my day)
Cut a tiny slit in the corner of the bag and now you can "pipe" the frosting neatly onto the cakes
I dusted mine with cinnamon, but other cute ideas are to top with brown sugar, walnuts, etc.


As always, I knew this recipe was a success because I had exactly zero leftovers. Nada. Just lots of empty plates and platters and that is the way I like it.

Hope you enjoy this yummy fall treat!

Friday, September 16, 2011

Cheddar and Onion Scones

A savory breakfast lover's dream, these creamy biscuit-like scones are simply divine. The best news is that the recipe is totally interchangeable, so you can tailor it to your liking day by day.

Props to Smitten Kitchen for a convincing me that scones can be a cinch to make. My worry melted away as I saw that the steps were quite simple, the ingredients were quite few, and after a few quick pulses on my Cuisinart, these dreamy creamy scones would soon be mine.

When out of town guests headed were headed our way last weekend, I knew I had to prepare the perfect something for a morning pick-me-up. Inspired by one of our favorite Cambridge bakeries, Darwin's Ltd., it was clear I would need to go with something savory - perhaps a remake of Hubby's and my ultimate Saturday indulgence: the cheddar and onion scone.

My cousin actually said to me, "I wasn't too excited when you told me you made scones, but I didn't realize they could be soft and moist!" Or something to that effect... :) I took it as a compliment - but it was the empty service platter that further validated my assumption.

Without further ado, the recipe. As I mentioned before, please replace our cheddar and onions with your favorite treat - chocolate chips, blueberries, bacon, etc...

America's Test Kitchen Cookbook, via Smitten Kitchen
(with, of course, our own personal cheddar and onion rendition!)

Ingredients
2 C all-purpose flour
1 T baking powder
1/2 tsp salt
3 T sugar
5T chilled unsalted butter (cut into little cubes)
*1/4 lb cheddar cheese
*1 red onion, caramelized
1 C heavy cream
(*if using another filling, something in the 1/2 C range is a good measure)

Directions
Preheat oven to 425
Place dry ingredients in Cuisinart (flour, baking powder, sugar, salt)
Pulse six times (if doing by hand, just mix together quickly)
Add cubed butter to Cuisinart and pulse until meal-like (not too many times...use forks to press into dry ingredients if doing by hand)
Add cheese and onions
Add heavy cream and stir for 30 seconds until dough-like
Flour a clean dry counter top
Place dough onto floury surface and quickly mold into desired shape (for me, I molded by hand into a 1 in high square; also consider using a 9" round cake pan as a mold, or a biscuit cutter for a round shape)
Next, cut your dough into the desired shape - I simply used a sharp knife to create 3x3 squares (in retrospect it would have been cute to then cut the squares into more scone-like triangles)
If using the round cake pan method, turn dough out and cut into wedges
At this stage, it is safe to freeze your unbaked scones - I transferred mine to a freezer-safe plate and covered tightly with plastic wrap, then foil (when ready to bake, place right onto baking sheet and add a few minutes to baking time)
Place on baking sheet and bake until light brown for 12-15 minutes
Remove from oven, let cool and serve to a hungry audience :)


Friday, September 9, 2011

Sneak Peek

Well, I managed to make a certified mess of our kitchen this morning... but I think it will be well worth my pending adventure in clean-up.

Cheddar Onion Scones (in the making)


Wednesday, April 6, 2011

Wifey Wednesday

We are in love with our Colquitt pecans! We are trying every excuse to eat some more, so here is another yummy recipe we whipped up (remember our brie en croute??).

Easy Pecan Pesto

Ingredients
1 C Colquitt pecans
1 C basil (or more!)
1/2 - 1 C Parmesan cheese
2 T olive oil
Salt and pepper to taste

Directions
Throw all ingredients in Cuisinart
Pulse until fine
If too chunky, add more olive oil
If too oily, add more pecans, basil and cheese
Add salt and pepper to taste
Serve as an appetizer, over chicken, or as a sauce for pasta
We recommend microwaving the pesto ever-so-slightly (under 10 seconds) because it is SO yummy when warm!

Enjoy!


Tuesday, March 8, 2011

Why, happy birthday!

Happy birthday, Life as a Wife! Welcome to the (hopefully-not-so-) terrible two's...
I also want to take this opportunity to sincerely thank everyone who passes a glance here at my blog (hi, Mom!) - your readership is much appreciated and I am grateful for your loyalty and encouragement. I'm excited to enter this third year of blogging, and hope it will be fun-filled and that I'll be able to share some new and exciting adventures with you, so don't be a stranger! Follow along and please, pretty please, leave me some notes! Have I ever mentioned how much I love when you leave comments? :)

In the meantime, let's celebrate with brie en croute! Thanks for the inspiration, Paula Deen.


Ingredients
1 8 oz wheel of brie (or a large wedge like I used)
1 sheet puff pastry
1/2 C COLQUITT pecans (thank you Sass and JB!)
1/4 C brown sugar
1 T butter
1/8 tsp cinnamon
1 large egg

Directions
Preheat oven to 375
Remove puff pastry from freezer and let thaw for 15 minutes or until soft
Melt butter in warm skillet and add pecans
Saute until golden, just a few minutes
Add cinnamon to pecans and coat thoroughly
Once puff pastry is thawed, roll out over flour if necessary to achieve a flat surface (my Pepperidge Farm puff pastry arrived in a tri-fold, so I did have to roll out with a pin)
When pastry is flat, place brie in the center
Pour toasted pecan mixture on top of brie
Sprinkle brown sugar on top of pecans
Now, wrap up your brie! You'll see I made a very simple envelope fold below. Typically I would add some cute shapes (hello, Shamrocks for March!), but Hubby was taking this to a Scotch night party, so I didn't want to overdo it :)
Beat the egg and lightly brush crust with egg wash
Bake at 375 for 10-15 minutes or until golden (just imagine how all that brown sugary goodness is getting ooey gooey melty inside!)
Serve and enjoy!

Wise words from my Dad: Keep in mind that brie melts fast in the oven. Especially if you are using a wedge like me, you'll want to keep a close eye on it.


Friday, February 4, 2011

Cha-Cha-Chalupas

Ok, so we have a Mexican food problem. I can't say I didn't tell you so.


Chalupas have always been a staple meal for me. Growing up, my mom would make them practically by the dozen for me to chow down on after soccer practice or cross country training. Not to mention, they were a big-time Friday lunch favorite at girls' camp. Did I mention our camp had the best food ever? We always joked that "some people eat to live... we live to eat." Little did I know how telling this would be of my food-loving future :)

The best part is, chalupas couldn't be easier to make. You could probably tell me how to do it based on the picture, so here's a quick grocery list:

Ingredients:
flat crispy taco shells (we fried some corn tortillas - so, so good!)
shredded cheese (again, your fave - we used cheddar)
refried beans, warmed
shredded lettuce
diced tomatoes
jalapenos (opt)
salsa (we love our spicy El Fenix salsa shipped straight from the Big D!)
guacamole, sour cream, etc are all great extras :)

Directions:
Assemble, silly!
(aren't you glad this doesn't involve cooking? we've worked hard enough this winter)


TGIF my friends. If you did not get a chance to download a fun iPhone wallpaper yesterday, check it out!

Tuesday, February 1, 2011

Tortilla Soup

If you lived here:


...and some of us do...

Wouldn't you like some hot and delicious soup to warm up? 


Try our slightly twisted version of tortilla soup - the carrots remind us of our all-time Dallas favorite, Veracruz Cafe :) If you're not a carrot fan, just swap for bell peppers - or try both! The beauty of tortilla soup is that it is super easy to alter to your liking. I hardly ever make two batches the same, depending on what we'd like that day (or what's in the pantry!).

Ingredients:
1/2-1 lb bone-in chicken breast (again... this is a time where you could buy a pre-cooked rotisserie)
Chicken broth (1 box your favorite brand)
2 carrots, finely chopped (here's a trick: avoid having carrots roll off the chopping mat by giving them a vertical slice to make a flat edge)
1 large white onion, finely chopped
2 cloves minced garlic
2 jalapenos (whole; optional if you're not into spicy)
3 vine-ripened tomatoes, diced
salt and pepper to taste
1/4 stick butter
1/2 packet taco seasoning (we bought McCormick's)
Cheese (we used cheddar this time, but feel free to get crazy - melty varieties are best and monterrey jack and queso fresco are other excellent options)
Tortilla chips
Avocado, sliced
Lime (opt)
Sour Cream (opt)

Directions:
Sautee onions, carrots and garlic in butter in a large sturdy pan (I used my Le Creuset dutch oven).
Sautee for a long time... if you think you're done, wait 10 more minutes. You don't want any bite in your soup, after all.
Meanwhile, cook the chicken by placing it in a large stockpot and covering with water. Bring to a boil for 15ish minutes, until meat is cooked through. Remove from water and let cool.
Add tomatoes to the onion base.
Shred chicken using a fork and add to onion/tomato base.
Add taco mix and salt and pepper to taste.
Add chicken broth to onion base until desired thickness achieved. I like my soup pretty ingredienty... if you'd like yours to go further or be a little more brothy, feel free to add water. All that simmering will bring the water up to speed with the other flavors.
Add jalapenos (whole) and let simmer for 45 minutes to 3 or more hours (of course, the longer the better). Season as needed during simmering process.
Now, my favorite part: fill the bottom of a bowl with lots of tortilla chips and a little cheese.
Next, ladle your soup right in.
Top with avocado, sour cream, cheese and more chips - to your liking, of course!

Don't you feel warmer already?


LinkWithin

Related Posts with Thumbnails